


Installing Surveillance Camera System: Expert Tips for Success
- Бонус за регистрацию онлайн казино
- 4 hours ago
- 16 min read
Putting up a surveillance camera system isn't just a weekend project; it's a strategic move that unfolds in a few key stages. You've got to plan your layout, pick the right gear, mount and wire the cameras, and then get the software dialed in. The real secret to success? It all happens on paper before you even open a box. A solid plan from the get-go ensures you cover all your critical spots without having to backtrack and redo costly work.
Your Strategic Blueprint for a Flawless Install
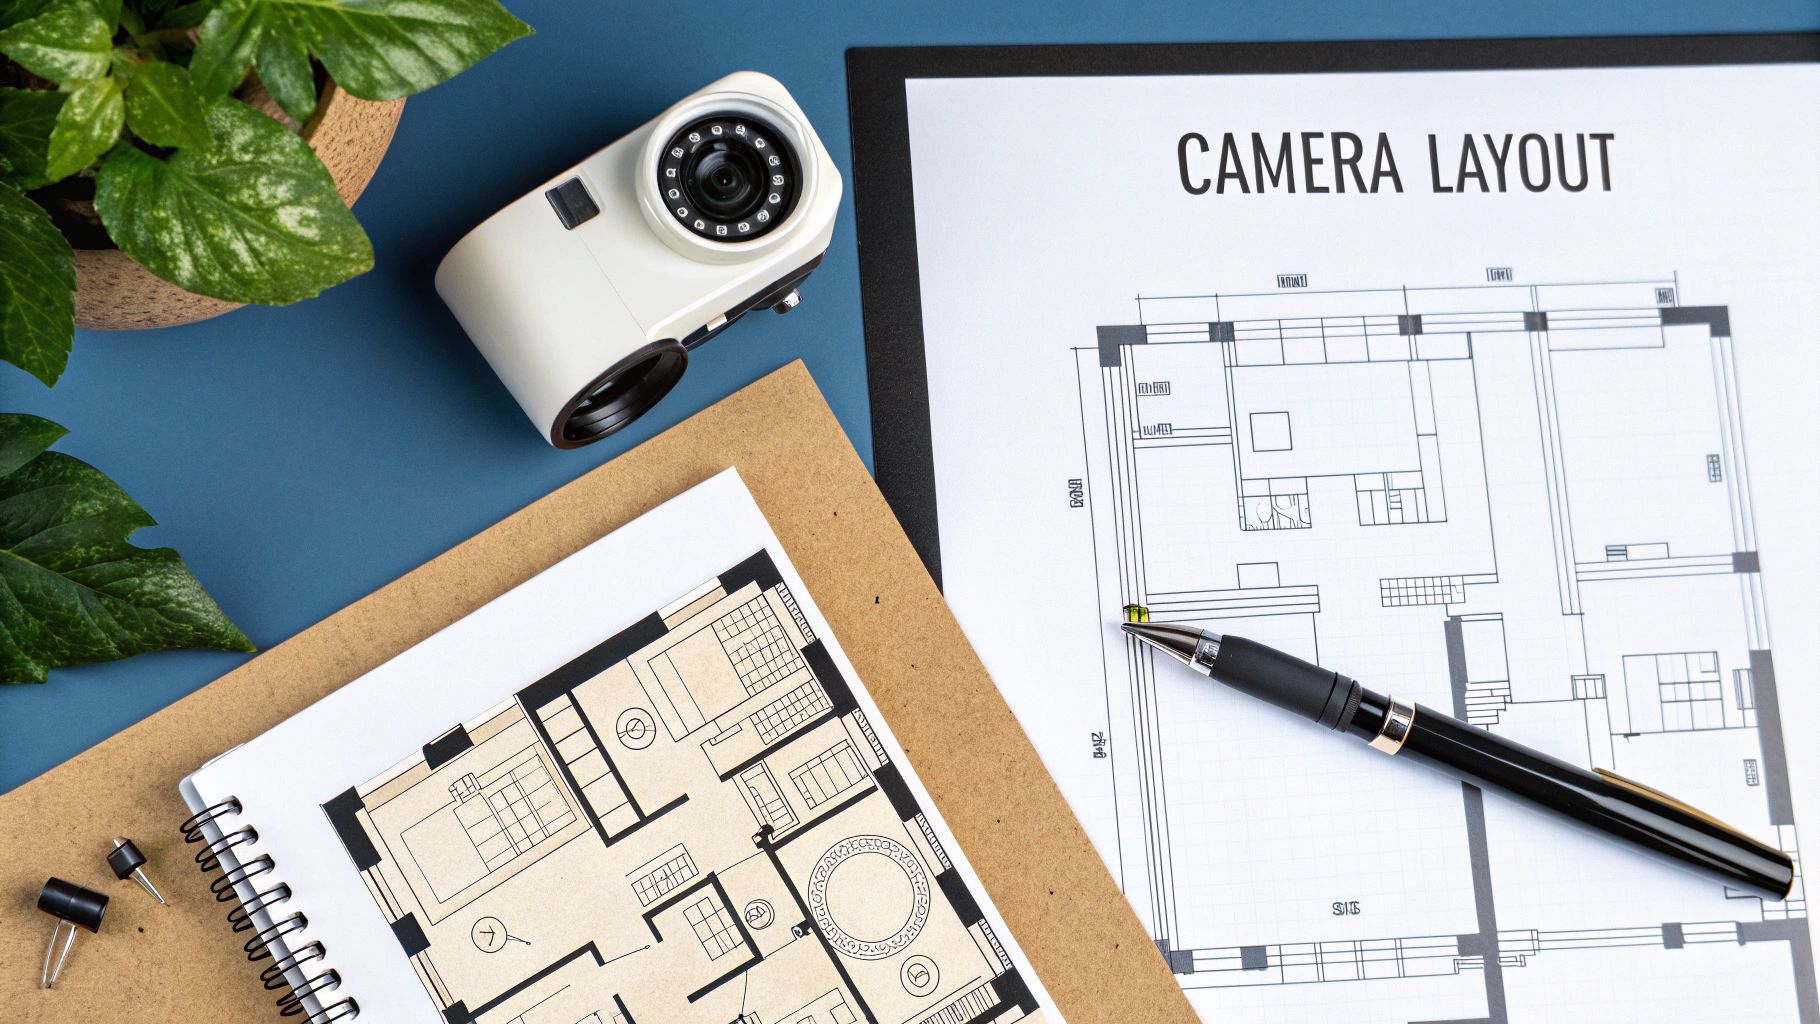
Before a single drill bit spins or one cable gets pulled, the most important work you'll do is sketching out a detailed plan. I've seen it time and time again: a well-thought-out blueprint is what prevents the classic headaches like blind spots, grainy footage, and running out of storage. This is how you make sure your security investment actually pays off, whether you're securing a small office or a sprawling, chaotic construction site.
The demand for this kind of security is booming. The global market for surveillance cameras was recently pegged at USD 43.65 billion, and it's expected to climb to USD 81.37 billion by 2030. That’s a healthy 11.2% growth rate every year, driven by a greater focus on security and a wave of new infrastructure projects. It just goes to show how essential these systems have become.
Get Boots on the Ground for a Site Assessment
First things first: walk your property. And don't just walk it—scrutinize it. Put on two hats: one of a security pro, and one of a person trying to find a way in. Your goal is to identify the non-negotiable areas that absolutely must be under watch.
Entrances & Exits: Every door, loading dock, and gate is a priority. This is where people and vehicles move in and out.
High-Value Zones: Where do you keep the good stuff? Pinpoint the spots with expensive equipment, critical inventory, or sensitive data.
Weak Spots: Look for the easy targets. Think dark fence lines, unlit back alleys, or any area that offers easy cover for someone who shouldn't be there.
Natural Funnels: Find those "choke points"—hallways, stairwells, and main pathways that everyone has to pass through.
For instance, a construction site supervisor will want a camera squarely on the main gate to capture license plates, another watching the tool-filled storage container, and a few more covering the perimeter fence. The owner of a small retail shop, on the other hand, will focus on the front door, the cash register, and the back office where the server is kept.
A lot of people only think about catching bad guys after the fact. But a truly great surveillance plan is also an operational tool. It can help you monitor employee safety, confirm deliveries, and even settle on-site disputes.
Map Out Your Camera Placements
Once you know what you need to see, you can figure out where to see it from. Grab a floor plan or just sketch out the property layout and start marking potential camera spots. This is where you have to think about the real-world gremlins that can mess up a perfect shot.
As you mark each location, ask yourself:
What's the light like? Is a camera going to be blinded by the afternoon sun, making the footage useless? Is there enough light at night for the infrared to actually work well?
Are there any obstructions? What happens when a big delivery truck parks in front of the loading dock camera? Or when new pallets of inventory get stacked high? Plan for these things.
Where are the privacy lines? Make absolutely sure your cameras are only recording your property. The last thing you want is to be pointing them into a neighboring business, a private home, or sensitive areas like restrooms.
For outdoor or remote setups, power is a huge consideration. It's smart to look into sustainable energy solutions early in the planning stage. This is a game-changer for construction sites or large properties where running hundreds of feet of electrical wiring is either impossible or way too expensive. Thinking about your power source now will save you from major headaches later.
Choosing the Right Cameras and Recording Hardware
Once you’ve mapped out your property and pinpointed the critical spots, it’s time to get into the gear. This is where your surveillance plan comes to life. Choosing the right cameras and recording hardware is arguably the most important decision you'll make. Get this right, and you'll have a reliable system that delivers clear, useful footage. Get it wrong, and you could end up with a grainy, unreliable setup that fails you when it matters most.
This isn't just about grabbing the camera with the best-looking specs off the shelf. It’s about matching the technology to the real-world demands of your space. A camera that’s perfect for a quiet office will be completely useless on a rugged, dusty construction site or at a temporary outdoor event.
This breakdown shows you what to consider when it comes to camera types, video quality, and how to allocate your budget.
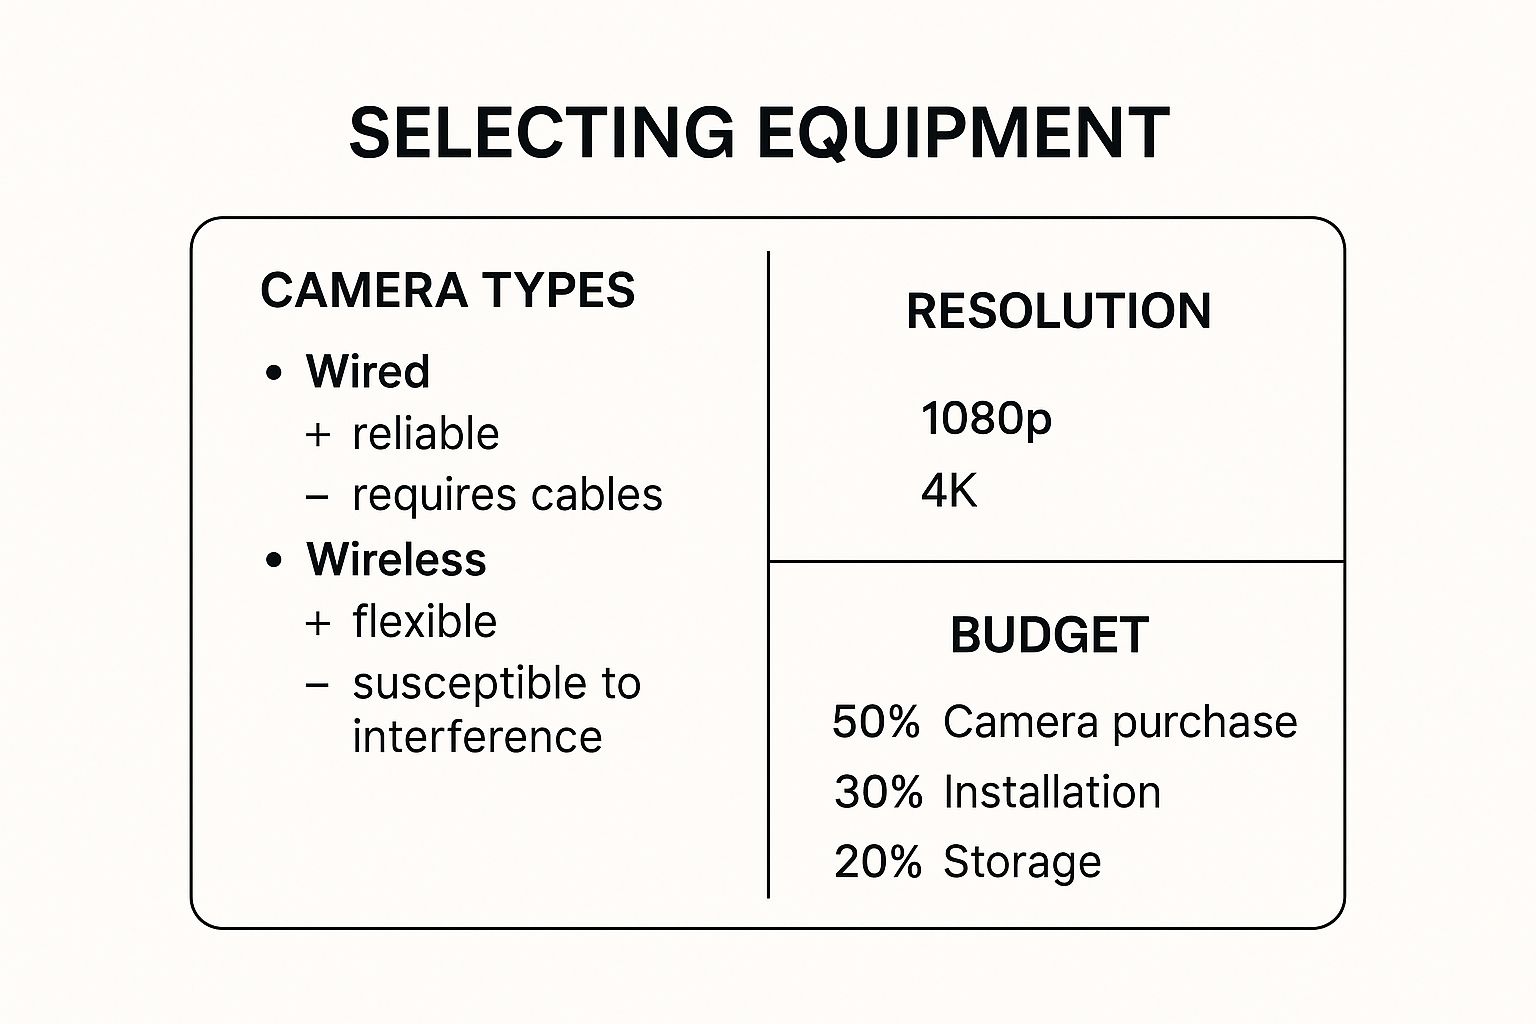
As you can see, a smart budget puts the emphasis on the cameras themselves, with installation and storage as the next priorities. This balanced approach is the key to an effective system.
Decoding Camera Types for Your Specific Needs
The physical style of a camera isn't just for looks—it dictates what the camera does best. Understanding the strengths and weaknesses of each type is fundamental to building a system that covers all your bases without compromise.
Deciding which camera to use can feel overwhelming, but it's simpler when you match the camera type to the environment. Different scenarios call for different tools. For instance, what works for a small storefront won't be suitable for a sprawling construction site.
Here’s a look at how the most common camera types stack up in different settings.
Camera Type Comparison for Different Environments
Camera Type | Best For | Pros | Cons |
|---|---|---|---|
Dome Cameras | Indoor retail, offices, lobbies. | Discreet and tamper-resistant; difficult to see where the lens is pointing. | The dome cover can cause IR glare at night; not ideal for long distances. |
Bullet Cameras | Outdoor perimeters, parking lots, entry points. | Highly visible (acts as a deterrent); excellent weather resistance and range. | More obvious and potentially easier to tamper with; can be an eyesore. |
Turret Cameras | General-purpose indoor/outdoor use where night vision is key. | No IR glare issues; easy to aim; good balance of features. | Less discreet than a dome camera; can be more susceptible to direct impact. |
PTZ Cameras | Large open areas: event spaces, logistics yards, active job sites. | Allows for active monitoring with pan, tilt, and powerful zoom capabilities. | Expensive; requires an operator for best use; overkill for small, static areas. |
Ultimately, the goal is to select the right tool for the job. A mix-and-match approach is often the most effective strategy, using different camera types to cover specific vulnerabilities across your property.
The right camera choice is all about context. A PTZ camera is overkill for a small office hallway, but a stationary dome camera would be completely ineffective at monitoring a large, active construction zone where threats can emerge from any direction.
Understanding Key Camera Specifications
Beyond the physical shape, a few technical specs will make or break the quality of your video footage. It’s easy to get lost in the jargon, so I always tell clients to focus on these three core features.
Resolution: This is all about clarity. While 1080p (Full HD) is a decent starting point for general surveillance, 4K resolution is where you see a massive difference. That extra detail is what allows you to actually identify a face, read a license plate, or digitally zoom in on a recording without it turning into a pixelated mess.
Field of View (FoV): This is simply how wide of an angle the camera can see, measured in degrees. A wide FoV (like 120°) is great for covering a whole room with one camera. A narrower FoV (around 60°) is better for zeroing in on a specific spot, like a cash register or a single doorway.
IR Night Vision: This is a must-have. The camera uses infrared LEDs to see in total darkness, creating a sharp black-and-white image. The spec to watch for is the IR distance—that’s how far it can see. For most commercial uses, a range of 100 feet is a solid benchmark.
The Heart of Your System: NVR vs. DVR
Finally, all that video has to be recorded somewhere. Your cameras will connect to a central recording device, and this choice really dictates your system's capabilities.
Your two main options are an NVR or a DVR.
A Network Video Recorder (NVR) is the modern standard and the one I recommend for virtually all new projects. It works with modern IP (Internet Protocol) cameras, which connect to your network with simple Ethernet cables. This gives you much higher resolution, more flexibility in camera placement, and opens the door to smart features like video analytics.
On the other hand, a Digital Video Recorder (DVR) works with older analog cameras connected by bulky coaxial cables. While the initial cost might seem lower, DVR systems are severely limited in video quality and lack the advanced features you get with an NVR. For any new professional installation, an NVR is the only way to go.
Putting It All Together: The Physical Installation
Alright, you've got your plan and your gear. Now comes the hands-on part—getting those cameras mounted and wired up. This is where your security vision starts to become a reality. It might look like a lot of work, but if you're methodical, you'll end up with a clean, professional setup that will last for years.
The demand for this kind of security is exploding. The whole video surveillance market shot up from USD 23.6 billion in 2019 and is on track to hit USD 62.4 billion by 2027. It just goes to show how essential these systems have become for businesses everywhere.
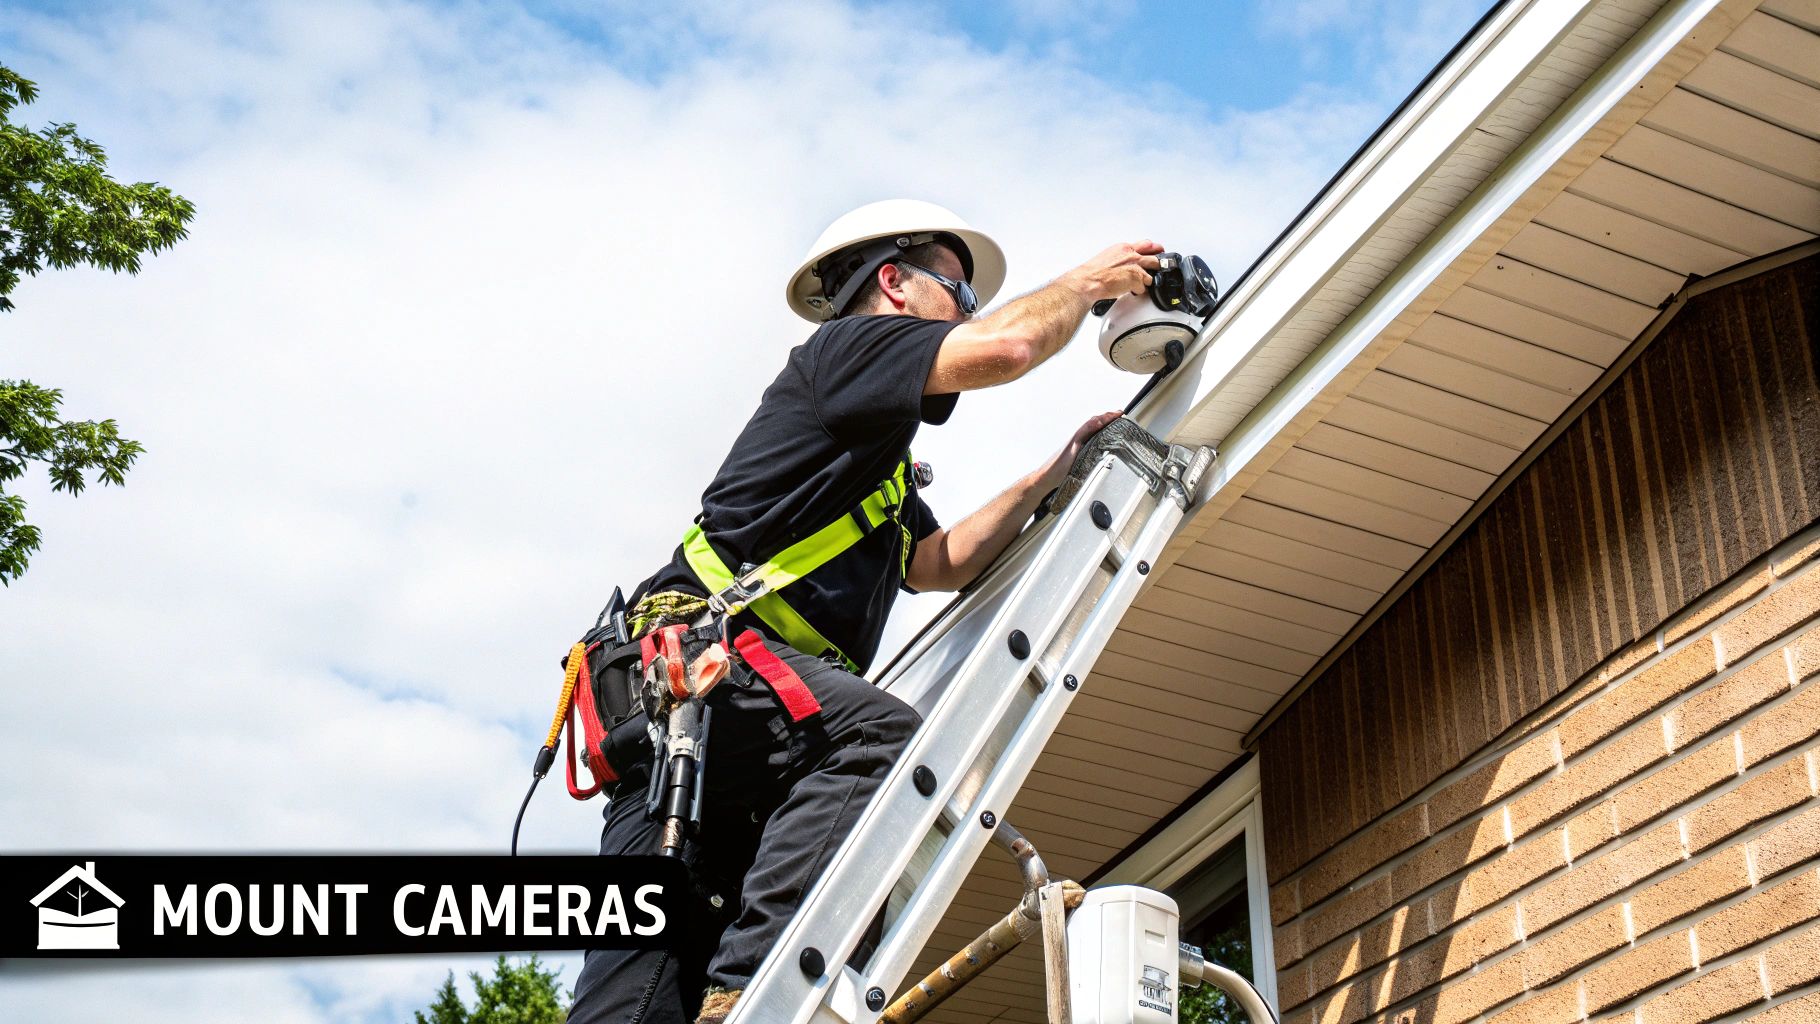
Getting the Mounts Right
A shaky camera is a useless camera, so getting a solid mount is everything. The biggest rookie mistake is using the screws that came in the box for every surface. You have to match your hardware to what you're drilling into, or you’ll be picking your camera up off the ground in a few weeks.
Drywall: Never screw directly into drywall. It's just not strong enough. Use toggle bolts or heavy-duty winged anchors to give the screw something solid to bite into.
Wood or Metal Siding: This is usually the easiest. Just drill a pilot hole that's a little smaller than your screw. This stops the wood from splitting and makes for a much tighter fit.
Brick or Concrete: This takes a bit more muscle but gives you the most secure mount possible. You'll need a hammer drill with a masonry bit. Drill your hole, pop in a plastic or lead anchor, and then drive your screw in.
My Two Cents: Once a camera is up, give it a good, firm wiggle. If it moves at all, it’s not secure enough. It’s far better to redo it now than to have a strong wind or a well-aimed rock knock it out of alignment when you need it most.
Don't forget about placement height. Aim for at least 10 feet up. This simple step puts the camera out of easy reach, making it much harder for someone to tamper with or disable. Before you cinch everything down, pull up the live feed on your phone to make sure the camera sees exactly what you planned for it to see.
Running Your Wires Like a Pro
The way you run your cables is what separates a professional installation from an amateur one. A tidy wiring job isn't just about looks; it’s about reliability and security. The less visible and accessible your cables are, the less vulnerable they are to being cut, whether by accident or on purpose.
The PoE Ethernet Approach
For most modern IP systems, you’ll be using Power over Ethernet (PoE), which is fantastic because one cable handles both power and data. That one cable is your lifeline, so you need to protect it.
Always Use Conduit Outside: Don't just tack an Ethernet cable to the side of a building. Run it through PVC or metal electrical conduit. This protects it from sun, rain, and anyone thinking of messing with it.
Create a Drip Loop: Before a cable enters the building, let it hang down in a small U-shape. This little trick uses gravity to make sure rainwater drips off the bottom of the loop instead of following the cable right into your wall.
Seal Every Hole: Any hole you drill through an exterior wall needs to be sealed up. A good weatherproof silicone caulk on both the inside and outside will keep water, drafts, and pests out.
Making sure you're using the right gauge of wire is also a big deal, especially for longer runs. Proper and accurate cable sizing prevents power drop-off that can cause cameras to fail.
Tips for Wireless Setups
Going wireless avoids a lot of drilling, but it comes with its own challenge: maintaining a rock-solid Wi-Fi signal. Signal strength is everything.
Watch Out for "Signal Killers": Thick concrete walls, metal siding, and even large appliances can absolutely kill a Wi-Fi signal. Plan your camera locations with these obstacles in mind.
Place Extenders Smartly: If you need a Wi-Fi extender, don't put it right next to the camera where the signal is already dead. Place it about halfway between your router and the camera to effectively bridge the gap.
Use a Dedicated Channel: Many routers let you assign devices to specific channels. If you can, put your security cameras on a less-crowded Wi-Fi channel to keep them from competing for bandwidth with every phone, tablet, and smart TV in the building.
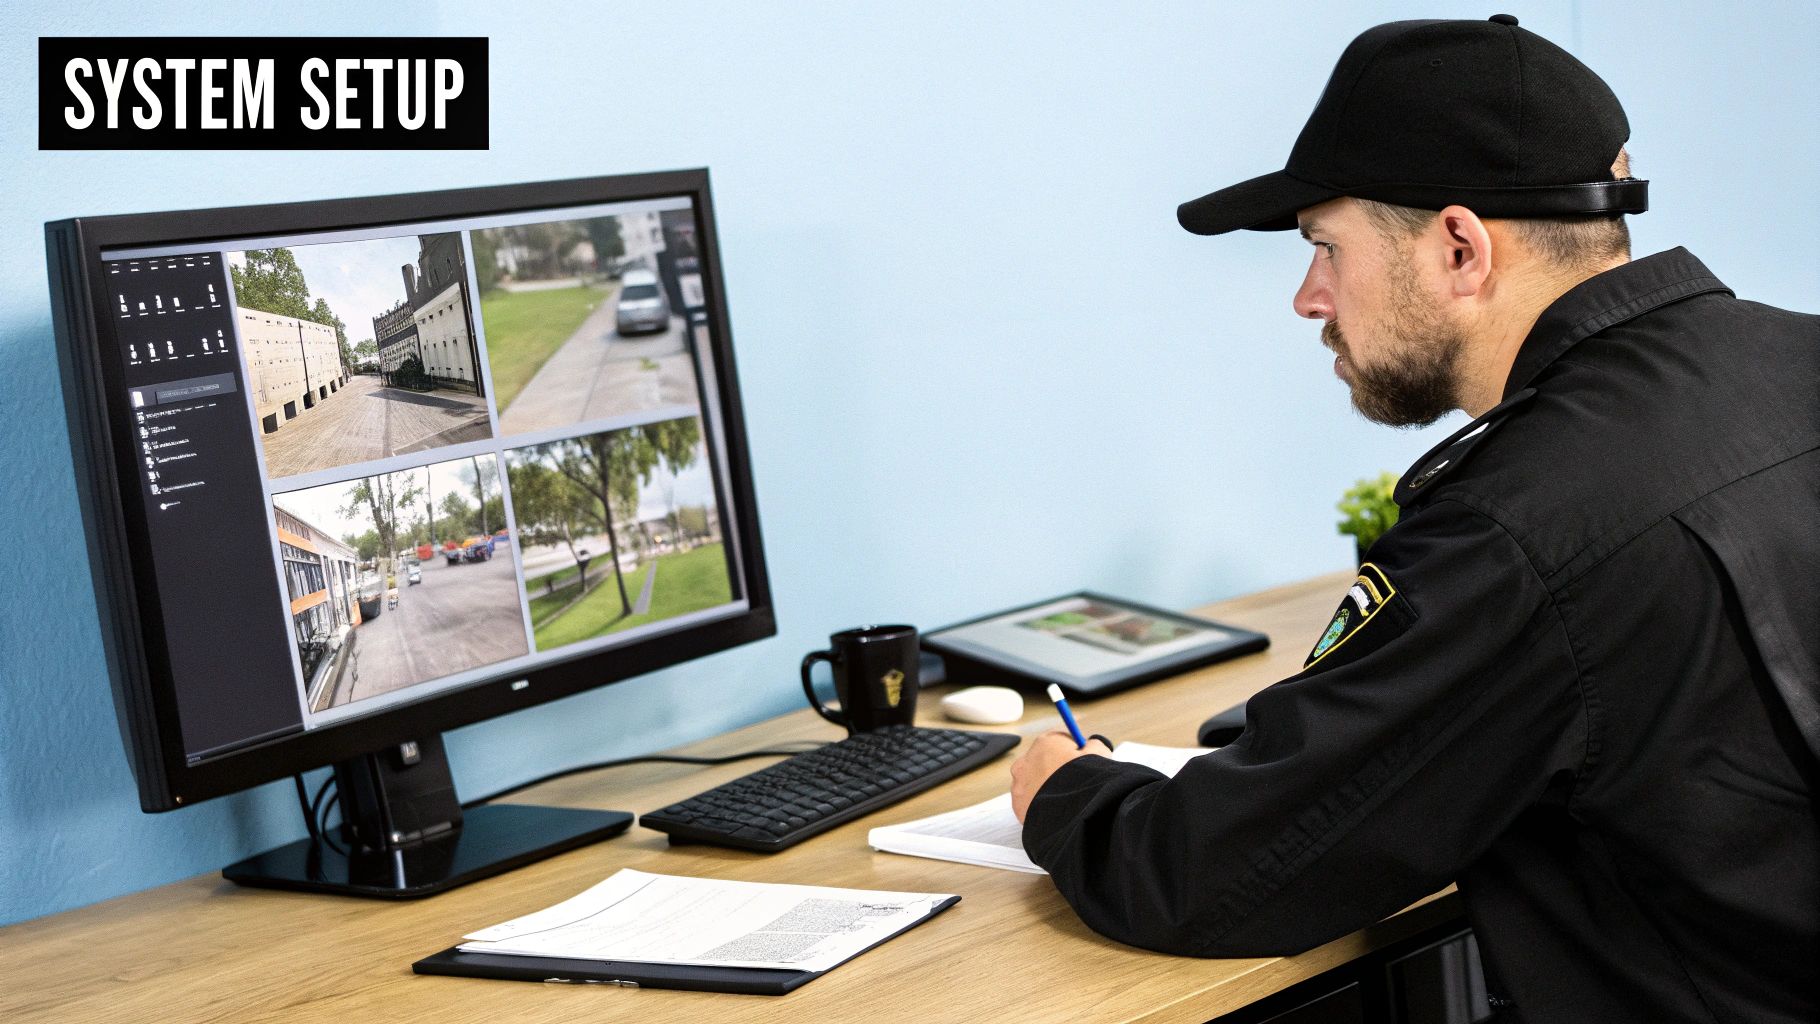
Configuring Your System for Optimal Performance
With your cameras mounted and the wires run, the heavy lifting is done. Now for the fun part: bringing the system to life. This is where you'll configure the software and turn that collection of hardware into a smart security tool that works for you.
Diving into a new system's interface can seem a bit daunting, but most modern NVR and DVR setups are pretty intuitive. You'll likely be greeted by a startup wizard, and it's going to walk you through the essentials. The very first thing it will ask for is a new password—don't skip this or get lazy. Using the default "admin" or "12345" is like leaving your front door wide open.
Foundational System Setup
Before you start tweaking motion alerts and setting up your phone for remote viewing, you've got to nail the basics. The recorder will immediately want you to format the hard drives. Go ahead and let it—this process wipes the drives and prepares them to store video correctly, which is crucial for continuous recording.
Once that’s done, you’ll want to focus on two settings that will have the biggest impact on your system's performance and how much footage you can store.
Recording Schedules: You can either record 24/7 (continuous) or set the system to record only when it detects motion. For a busy retail entrance, continuous is the way to go. But for a quiet storeroom or a construction site container, motion-only recording will save you a massive amount of hard drive space.
Video Quality Settings: It’s tempting to crank the resolution and frame rate to the max on every single camera, but you'll burn through storage in no time. I always recommend a balanced approach. Use the highest quality settings for critical spots—think cash registers, entry points, and license plate views. For general overview cameras, you can dial the settings back a bit without losing much detail.
Turning Your System into a Proactive Security Tool
A surveillance system that just sits there and records is a passive observer. To get a real return on your investment, you need to configure it to be a proactive security asset that tells you when something is wrong.
This is where motion detection comes in, and you need to do more than just flip the switch on. The real power is in customizing it. Modern systems let you draw specific "detection zones" right on the camera's view. You can draw a tight box around a sensitive doorway, for instance, while completely ignoring the tree next to it that sways in the wind. Taking a few minutes to do this can cut down on false alerts by over 90%.
The goal of a well-configured system isn't just to record what happened, but to provide timely, actionable intelligence. Tuning motion zones and alerts is what separates a simple recording device from a true security solution.
Once you've defined your zones, you can link them to specific actions. Setting up email or push notifications is non-negotiable. This means if someone walks into a secure area after hours, you get an alert with a snapshot right on your phone. That immediate heads-up is exactly what you need to respond to a problem before it escalates.
Enabling Secure Remote Access
One of the best things about modern security systems is being able to check in from anywhere. This is a game-changer for business owners wanting to keep an eye on things, construction site managers monitoring progress, or event staff watching crowd flow from a command post.
Getting this going is usually as simple as connecting your NVR to your network and scanning a QR code with a smartphone app. But security is critical here. Make absolutely sure the system you're using has encrypted connections to keep your video feeds private.
Beyond the initial setup, truly unlocking mobile access benefits can turn your phone into a portable security command center, giving you real peace of mind, no matter where you are.
Testing and Maintaining Your Surveillance System
Alright, the cameras are up and the system is powered on. It’s tempting to call it a day, but we're not quite there yet. The final, and arguably most important, part of the job is giving the whole system a thorough shakedown. This is what ensures your new setup is a reliable security asset and not just a bunch of expensive ornaments.
Think of it like this: you’ve spent all this time planning and running cables. Now, you need to prove it all works exactly as you intended. A little proactive testing now can save you from the nightmare of discovering a blind spot or a dead camera only after something happens.
Your Post-Installation Validation Checklist
Before you pack up the ladder, it's time to run through every camera with a critical eye. Don't just glance at the monitor and give it a thumbs-up. You need to methodically check each feed against the goals you set in the planning phase.
Image Clarity and Focus: Is the image actually sharp? Can you make out a face or a license plate from the intended distance? A camera that gives you a blurry, unusable image is a complete waste.
Viewing Angle Confirmation: Pull out your site plan and compare what you drew with what you see on the screen. Does the camera truly cover the entire area you needed it to? This is your last, best chance to tweak the angle and eliminate any surprise blind spots.
Day and Night Mode Functionality: This one's easy to test. Just cover the camera's light sensor with your thumb. You should hear a faint "click" as the IR filter engages, and the picture should flip to a crisp black-and-white night vision mode. If it doesn't, something's wrong.
Verifying Smart Features and Recording Integrity
Modern cameras are packed with smart features, but they're useless if they aren't working. Start by walking through the motion detection zones you created. Did your phone get the push notification? Did the system send the email alert? Test every rule you configured.
Next, and this is crucial, make sure the footage is actually being saved. Trigger a few recordings on each camera, then go into your NVR's playback menu. Find those clips and watch them. This simple check confirms that your hard drives are working and that you can retrieve evidence if you need to.
A system that doesn't reliably record and alert you is just giving you a false sense of security. Seriously, take 30 minutes to test these core functions. It's the most valuable thing you can do after the physical installation is complete.
Establishing a Long-Term Maintenance Routine
Your surveillance system isn't a "set it and forget it" device. It's exposed to weather, dust, and potential software bugs that can degrade its performance over time. A simple, consistent maintenance schedule is what keeps it running reliably for years.
This is more important than ever. The global CCTV camera market was recently valued at USD 51.04 billion and is expected to rocket to USD 234.11 billion by 2034. That explosive growth shows just how much people are relying on these systems, which makes proper upkeep non-negotiable. You can learn more about these market trends and what they mean for the industry.
Set a recurring reminder on your calendar to knock out these simple tasks:
Clean Camera Lenses: A quick wipe with a microfiber cloth gets rid of dust, grime, and spiderwebs that can ruin your shot.
Check Cable Integrity: Do a quick visual inspection of any exposed cables. Look for any signs of fraying, cracking, or damage from critters.
Update System Firmware: Every so often, log into your NVR and cameras to check for firmware updates. These often include critical security patches that protect your system from being hacked.
Review Footage and Angles: At least once a quarter, quickly scan through your cameras. Make sure they haven't been bumped out of alignment and are still covering what matters most.
Your Top Questions Answered
Even the best-laid plans can hit a snag. When you're in the middle of a camera install, questions always come up, and getting the right answers can save you a ton of time, money, and frustration down the road.
I've been in this business a long time, and the same handful of questions pop up again and again. Let's walk through them, one by one, so you can move forward with your project without any second-guessing.
How Much Storage Do I Really Need?
Trying to nail down your storage needs can feel like a shot in the dark, but there's a simple logic to it. It really just comes down to a few key factors.
The amount of hard drive space you'll chew through is a direct result of:
How many cameras you're running.
The resolution you've set (1080p, 4K, etc.).
Your chosen frame rate (FPS).
Whether you're recording 24/7 or only on motion.
As a quick rule of thumb, a single 1080p camera recording continuously will eat up somewhere between 15 and 30 GB of data every single day. Do the math, and a small 4-camera setup could be generating over 100 GB of footage daily. That adds up fast.
Here’s a pro tip that makes a huge difference: pay attention to video compression. Modern recorders use a codec called H.265, which is a game-changer. It's about twice as efficient as the older H.264 standard, meaning you can store twice the amount of video on the exact same hard drive. It's a massive benefit.
So, what’s the magic number for retention? For most small businesses, keeping 14 to 30 days of footage is the sweet spot. For a typical 4-camera system, starting with a 2TB or 4TB drive is a really solid choice.
Should I DIY or Hire a Professional Installer?
This is the classic cost-versus-complexity question. Doing it yourself can definitely save some cash upfront, but there's no substitute for a professional install that’s done right the first time. The best path for you really depends on the size of your project and your own comfort level with this kind of work.
A DIY install is probably a good fit if:
You're only setting up a few cameras (think 1-4).
You're using wireless or simple plug-and-play PoE cameras.
You know your way around a drill, can run a cable neatly, and aren't afraid of basic network settings.
But for anything more involved, calling in a pro is almost always the smarter move.
If your project involves pulling multiple cables through walls and ceilings, needs to tie into an access control system, or requires perfectly placed, tamper-proof cameras, it's time to hire a professional. An experienced installer knows how to handle the inevitable curveballs and will deliver a clean, reliable, and code-compliant system.
A pro also brings an expert eye for placement, ensuring you get maximum coverage without blind spots. That expertise alone can save you hours of trial and error.
What Are the Legal Rules for Placing Cameras?
This is the one area where you can't afford to make a mistake. The laws around surveillance can vary, but a few core principles are universal and designed to protect people's privacy.
The big one is the "reasonable expectation of privacy." You absolutely cannot place cameras where people expect to be private. That means places like restrooms, locker rooms, and employee break areas are strictly off-limits.
Audio recording is another minefield. In many places, it's illegal to record conversations without getting consent from everyone involved. Frankly, the safest bet is to just disable the audio feature on your cameras unless you have a very specific, legally-vetted reason to use it.
When you're positioning outdoor cameras, make sure they are pointed at your property. You want to avoid capturing footage of a neighboring business's back door or a private residence next door. And finally, always post clear, visible signs stating that the area is under video surveillance. It's a great deterrent and it covers your bases by letting people know they're being recorded.
For a security solution tailored to your specific needs, from initial planning to professional installation and maintenance, trust the experts at PCI Audio-Video Security Solutions. Explore our advanced camera, access control, and alarm systems at https://www.pciavss.com.
Comments